Posts

Final Milestones, DOBBY IS FREE

Image
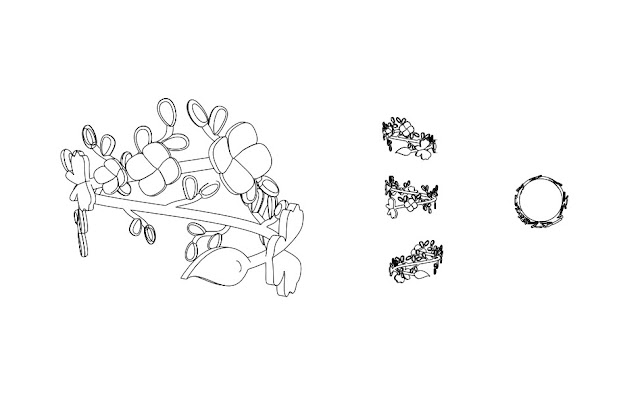
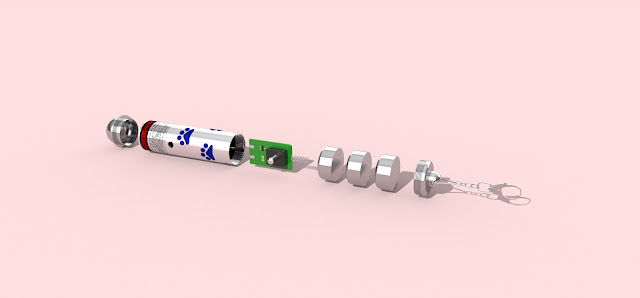
Project 1: Castle This project was a refresher for the basic tools on rhino. The castle project was probably my most favourite out of the rest. It was where I got to play around with rhino while making a fun fictional scenery. Project 3: Reverse Object Project 3 was most likely one of most successful ones. It was the hardest to make though since the laser was small and I had to do a lot of engineering on it. But all in all, I think it turned out pretty well. Project 2: Surface Design Though was the simplest ones out of all the projects, to me I find that it turned out well. Instead of having a full blown pattern across the board, I opted to having a pattern that is reminiscent of a compass to make it fun.  Shapeways Shop https://www.shapeways.com/shops/avecmuoi Since I couldn't activate the shop, this is the product set up:  

Lord of the rings: Last minute changes and Outsourcing

Image
So as a last minute decision, I ended up changing the ring I wanted to go forward with. I went off it based from the second thumbnail from the concept sketches and built more on to it to make it more complex.  This is my proof sheet for it: For the final ring, I had to do a lot of experimenting on the flowers and the leaves. During this whole process, the flow command did not like me at all, but i managed to find a way to make it work. Here are the renders: So the thing I was most worried for was probably how the ring would turn out in shapeways. Since I had a lot of thin parts of the ring. I was wondering if I'd have many fixes to do once I check the tolerance test. At first there was a lot of red places but once I changed the material to 'Smooth Fine Detail Plastic' it turned out fine. There's some little red parts, but I don't think it'll affect the final product all too much. So I think I'll risk it. :D

Lord of the Rings: Prototype

Image
From last weeks peer evaluation, thumbs 5,7, and 13 seemed to be the most interesting to others and I do agree with it. These were the few designs I was already leaning towards to.  For these ring prototypes, I just went for the basic shape and details of the rings. Here's the proof sheet: This is the 3D version: I struggled a lot on the flow tool for the middle three piece flower ring, since it wouldn't go one the surface the way I wanted it to. But with a lot trials and errors, I ended up with a happy accident and got it on there somehow. For now, I'm kinda stuck on which rings I want to go forward with, but the second and third ones would seem to be the ones that would be difficult but more fun to further work with.  

Lord of the rings: concept thumbs

Image
On this project, it’s all about coming up with different concepts for rings/and or accessories. I may or may have not gone overboard on the flower/nature concept-

Completed, rendering time 23:42

Image
Finally made it to the end! Honestly, it's been tricky making the laser pointer since it had so many small parts and measuring them were hell, but we've done it, we got to the end.  The final part I had to do this week was the chain, pawprints and the warning label. I was scavenging through a few youtube tutorials to find out how to wrap around the text and design around the laser pointer and thank god for this tutorial: https://www.youtube.com/watch?v=P-ARMAN3row&ab_channel=Josef1  Without that video the laser pointer wouldn't have looked as finished as it did. Here's an top overview of the exploded object: Side view: Details: Final Result: I'm actually really surprised with the results but also happy with it. At first, it looked off, but once I got through 80% of the parts and started adding textures, it was really coming together.

Laser Pointer Progress II

Image
Last class, we learned how to make springs and screw. I had a spring and several screw on caps on my laser pointer so this was a very helpful tool to bring me closer to complete my object. To be completely honest, I almost forgot how to make the springs and screws until my brain recalled everything last minute. Using the sweep1 tool I made the pointy screw on caps for all the open sides of the laser pointer. I then went on to make the circuit board. I first went to make the spring since it was the easiest part of it. The spring was a simple step of measuring the spring and using the helix tool to round it out. This was where I was having trouble with the circuit board. Theres a flat back that was rounded on the sides, but when I rounding the polysurface, there was one corner that just won't fillet like the others. It would create a new polysurface instead of making it part of the original one. The result of the circuit board:  

Reverse Project Progress

Image
For the Reverse Project, I decided to create the laser pointer. To start off, I started making the outside components of the laser pointer. First was the top part where the laser comes through. For this I started drawing the shapes I needed for the nub, which were mainly ellipses and rectangles and then used fillet on the sharp end to create the semi round area. I then trimmed them all down so I can revolve it into a 3D shape. Next was that protruding are of the nub that acts like a grip when you're twisting off the top. I drew the one groove and then used array polar. I then went to make the main body of the object, which was one of the easier parts. I just used extrudecrv to the height of the body and that was it. After was the batteries. Like the nub, I first drew the shapes with the rectangle tool and then used fillet to round it off. I then used the revolve tool.